DIY Twin Window Fan Air Filter
There are a number of situations where outdoor pollutants, like pollen, smoke from the outside, and urban air in general, are the main sources of poor indoor air quality.
An air purifier cannot intercept these intruders until they are already in the room, which means you are breathing them.
A partial solution to this is to the do-it-yourself window filter illustrated here. This project can be used fan-forced or without the fan. Existing exhaust fans, often already present in kitchens and baths, can pull air in through a stand-alone filter.
I have two residences, an apartment in stylish uptown Houston, and a rural cabin far from the exhaust emissions of the megalopolis.
In both I have installed home-built window mount filtered ventilation systems which pull outside air through filters.
These have reduced my reliance on air cleaners for normal sleep, saved air conditioning costs, and kept large particulate out, extending the lives of expensive HEPA filters in my purifiers.
I have run as many as seven air cleaners in the apartment, but get by with just two since the window filter went up.
The Houston window filter has been installed for over two years in a very rain-prone window. It has run 10 hours a day on all but the coldest winter nights.
It's time to take it apart and look at the dirt and water damage.
The filters are loaded with lots of black dirt, and the paper elements are water-stained a bit.
But I am surprised to find that the sill has fewer water stains than it had without the filter.
So the old filter has exceeded expectations.
Twin Window Fans
There is a wide selection of twin window fans available in big-box retail and online. None of them are premium quality - all of these fans are cheaply designed and built primarily in China.
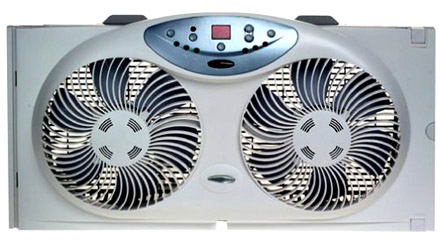
Here is the window fan I used, which matches 12 x 36 inch filters quite well in a "36 inch" wide window.

This fan has bi-directional electronic controls, but once the filter is installed, it will not be a very good exhaust fan.
I like the remote control, which lets me change the speed without getting out of bed.
There is also a thermostatic control which is supposed to automate operations. It is not used for this project, which is good because many thousands of these were shipped before somebody in Chinese quality control found out that the temp sensing wire was being installed laying across a circuit board that heated up as the unit ran.
My fan was among the defective ones - it doesn't matter for this project.
I have tried a couple other fans and like the Bionaire the best. Maybe I got lucky on the quality control, but my Bionaire BW2300 ran 4 years, most nights and many days in the apartment.
Your results may vary.
My wife refused to sleep without the window fan, even on cool winter nights when I am freezing.
My understanding, from reading Amazon reviews, is that 2010 and later builds have solved the loose wire issue.
There are other twin fans, as small as 7-inches, and as cheap as $16, but they are generally underpowered, and may be too weak to pull much air through the filter stack.
With the filter installed, street noise is also reduced as compared to an open window.
While less expensive models may be quite noisy, my wife likes to run the fan on high all night.
Some cheaper models have only one side extension, putting the fans off-center. Also the accordion type side extensions may be harder to seal. These may not be fatal flaws, but will sacrifice filter efficiency.
And some fans may be extractor fans with only an exhaust mode, unsuited to the DIY project.
At the cabin, I have an ordinary 20-inch box fan running in an upstairs window. It pulls fresh air in through the filter in summer. So the fan is optional if you want to try just the filters first.
Filter Materials
BEFORE BUYING ANYTHING, measure your window opening.
Make sure the width is not too large and there is enough sill depth to fit the assembly without needing to remove the screen.
Make sure the fan and filters chosen actually fit the window, and that the fan and filters are the same height (12 inches in this example).
While I have put filters in a vertical 36-inch slider window, fans will not fit casement-type windows, with cranks, handles, and locking mechanisms that protrude.
The furnace filter aisle has changed since I started doing these, notably the filters are more sophisticated and much pricier.
Also the 12 by 36 size is not as prominent in the higher filtration ratings, which are also changing.
Home Depot has set up its own 10 point filter rating scale, abandoning the old MERV ratings.
I finally get a 12 by 36 inch furnace filter, in one of the lower filtration ratings. In a few months I'll redo the project with two better quality filters and more carbon.
See another similar do-it-yourself project for discussion of filter materials:
DIY replacement for HEPA filter
I use "Frost King" 15 X 24 x 1/4 polyurethane foam, designed for room air conditioner replacement filters, 2 packs at 97 cents each.
And "Web Absorber Odor Control" filter material, a cut-to-fit package with green fiber filter impregnated with carbon on the back side. This is easily identified by the "pets and flowers" packaging
This filter package will consist of just one medium quality furnace filter, the Web absorber, and the foam prefilter on the outside.
The filters will be held together and sealed with 2-inch clear packing tape and household "Scotch" tape.
Scissors and tape measure are the only tools needed.

Filter Assembly
I measure the window opening, finding it actually is 35 5/8 inches.
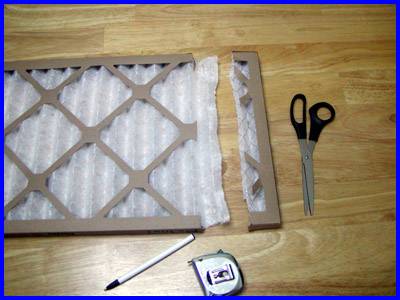
I cut about half an inch off the filter's length to make it fit.
Notice that none of the filter media is removed, only the cardboard edge is cut shorter. The filter media tongue is fit into the folds of the cut-off end, then sealed with scotch tape.
1/2 inch scotch tape is handy for holding the corners and covering the cut cardboard.


The next photo shows the assembled filter sandwich. The green Web Absorber filter's edge is just visible, and the polyurethane filter is closed and cornered with scotch tape.
Then the 2 inch packing tape is run along the edges to seal and waterproof the package.

Installation
The finished filter fits snugly in the window opening, The window is closed tightly against the top edge, and the entire periphery is heavily sealed with tape. No air should get around the filter, and it should be quite secure.
For those using no fan, or an exhaust fan elsewhere, this is the end.

Next, the fan is set on the sill, and sealed to the window frame, sill, and filter with 2 inch tape. All gaps are closed to prevent air short-cutting, and to keep the fan secure.

Conclusions
The object of this project is to bring cleaner fresh air into a room where air purifier(s) are already running.
With the kitchen and bath exhaust fans running, carbon dioxide does not build up in the sleeping area.
It may work simultaneously as a cooling fan, but with partial restriction from the filters.
But if you live in an area, like Houston, where the summer months are brutally hot, you can use a combination of a window fan and your air conditioning system through the night.
This brings cool night air into the apartment, often keeping the AC from running all night.
Done correctly, this will keep lots of dust out of the house. I believe savings on HEPA filters and AC will more than compensate for the cost (under $100 for this fan and filters).
Next time I will build a better filter, using two stacked furnace filters and thick carbon cloth, but these were not available off-the-shelf for today's project.
MATERIALS LINKS
The fan is still selling well at Amazon, for around $60:
Bionaire Twin Reversible Airflow Fan with Remote at Amazon.com.
Quality of the black polyurethane foam is variable, with some products emitting chemical odors.
I have had best results with the ALL-FILTERS brand, carbon-impregnated, 16 by 48 inch, "made-in-the-USA," out of Reno, NV;
Cut-to-Fit Carbon Pad for Air Purifiers at Amazon.com.
SITE NAVIGATION
End DIY Twin Window Fan Air Filter, goto Homepage: Air Purifier Reviews
